
*Will likely create a separate project page for Lectern build and link to it, but will keep it here for now.
This project page is for anyone wanting to use the lectern in the classroom for audio/video or streaming, as well as information on how the system works for troubleshooting, upgrading, etc.
There will be 2 sections: One as a basic user manual for the end user (instructor of a class), and another section for how it works, including signal flow, a buildout of the system hardware, software and settings used, and the lectern buildout.
For Instructors/Presenters: How to Start a Class
- Intro to the Lectern (where things are)
- Speakers and screens
- Additional Inputs
- Going Live
For any questions or help preparing, please consult the director of education or reach out to El Jefe in Discord.
“This Machine Kills Fascists” – The Lectern
Some people would call it a “podium” and those people would be wrong. But you can call it a podium if you want.
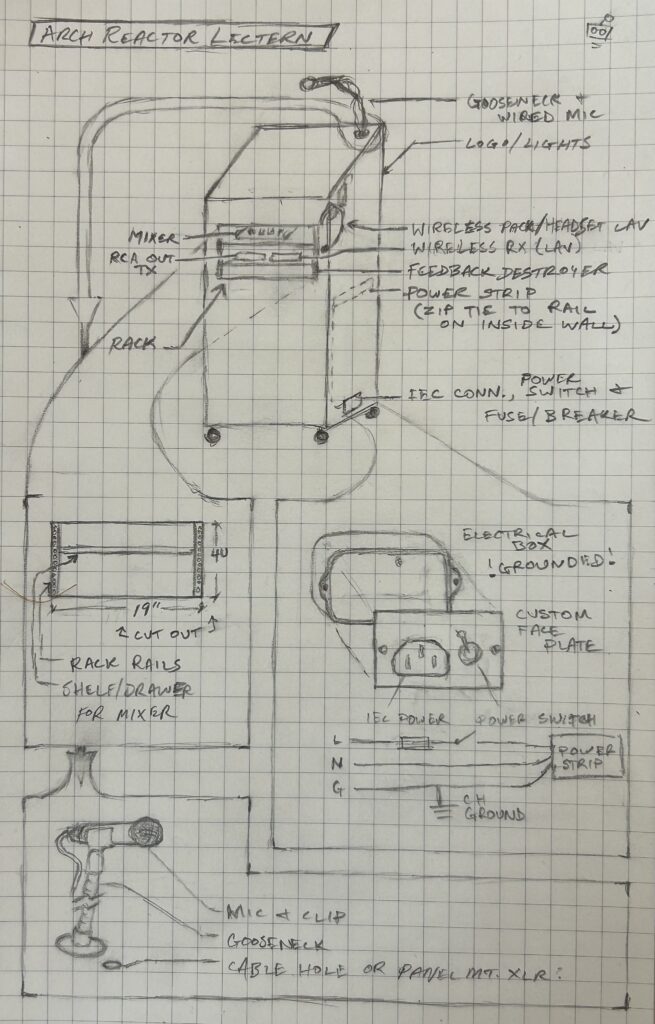
This superior steel structure of superscience is an old repurposed RFT newspaper box, equipped with a gooseneck-mounted dynamic microphone, secondary wireless headset mic, a small mixer, auto feedback control, (*HDMI input + ethernet jack for video output, touchscreen for output control) and a wireless transmitter for the audio so that the only cable it needs is power (*+ethernet loom).
You can use your own laptop via HDMI, or if you would rather use the computer in the classroom, you can have a potentially more convenient setup using our slide templates *(create link to new section)
As for the microphones, for best results, have the microphone close, particularly if you are quiet. The gooseneck is flexible, and there is also a wireless headset available. Your audio from those mics will be much clearer on the livestream if you are streaming, whereas the audio from the webcam may or may not be discernible aside from sound closer to the back of the room.
Speakers and Screens
The wireless transmitter on the lectern sends your audio when speaking out to the studio monitor speakers on the wall in the classroom, but also sends that audio to the stream if you are live-streaming. Additional speakers in the lab may be added in the future.
You can choose to project your slides to any combination of the TVs in the classroom and projector in the lab using the touchscreen buttons on the PiPo.
If you choose to do a livestream, your slides will also go out to the stream with a small PIP (bottom right of the frame) from the webcam at the back of the room by default. You may not want to put anything on your slides in the bottom right to get the best quality for streaming.
*Note: If you use the default slide templates on the classroom computer, the livestream will be able to detect when you change a slide, and on the livestream will switch between your slides full screen and the classroom or PIP view automatically. This can be much more engaging for online viewers but requires use of the slide templates.
Inputs: Be aware that the default is sufficient for you to pay attention to your class and not have to worry about inputs and outputs. This is especially true if you use the templates. If you’re wanting to do anything more complex such as having specific cues for seeing the classroom vs a slide, etc, you will very likely need another person to switch the inputs for you if you want to stay focused on your class.
Using Slide Templates and Sharing to the Classroom PC
You can use our template slides or make your own templates, just as long as each slide has the appropriate symbol in the top-left corner. This symbol tells the streaming computer to switch full screen to the new slide on the livestream when it appears.
*Find templates here: …
You can then upload your presentation to this folder, and it will automatically sync to the desktop of the classroom computer to be ready to go when you arrive at the space for your class (it’s recommended to still have a backup on a flash drive or equivalent in case there’s an issue with syncing).
Additional Inputs
Both the classroom computer and your personal system can be used at the same time, such as if you wanted to have your slides on the classroom computer and for instance, a software interface on your personal laptop to show examples of coding, CAD, or your massive library of cat videos.
When doing this, you can select which screen(s) you want which computer to go to. Keep in mind that the stream will still only be able to display one at a time, but can be set to switch between them.
** CREATE SETUP FOR STREAM OUTPUT TO LAB PROJECTOR
*In the future, there will also be the option to use a small handheld camera for certain projects to send that to one or more screens as well, such as if you’re wanting to show closeup details of a physical project to students at the back of the room.
Going Live
Press the *”Go Live”(?) button on the PiPo to start the livestream. *Recording classes without streaming may be available in the future.
Check the audio level indicator to see what the streaming computer is hearing from the room.
Checklist:
- Plug in Lectern
- Switch on Lectern
- Switch on speakers, mic should be audible through the speakers
- Plug laptop into HDMI or power on and open slides from classroom PC
- Optional: select sources (inputs) and screens (outputs)
- Optional: check audio levels to stream
- Optional: start stream
For Nerds: V1 Tech 101 (or… How it all works)
- Overall signal flow
- Lectern Build and Power
- Audio Routing
- Video Routing
- Streaming computer software (OBS)
- Control (Bitfocus Companion and PiPo computer)
- Classroom presentation PC setup
- Manuals and Documentation
ProTip: for anyone somewhat knowledgeable with AV signal flow or generally tech-savvy having issues with this system and wanting to save time reading this, I’d probably recommend putting this page into NotebookLM and asking it about your issue.
Overall Signal Flow
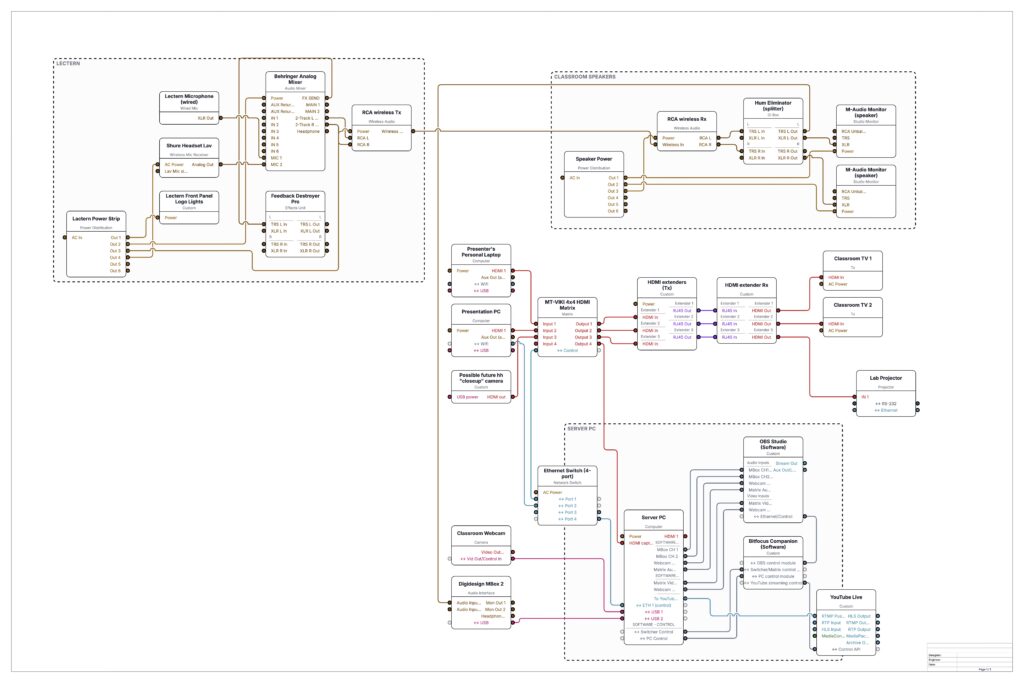
Diagram Details: Overly complicated and not final signal flow diagram (it even shows some power), so it’s not as bad as it looks.
Lectern Build and Power
More info on full lectern build: …
Brief description of power and ins/outs, possible issues and things to check when troubleshooting
Audio Routing
Lectern mic > mixer CH1
Headset mic > mixer CH2
mixer output > feedback destroyer > wireless transmitter
Wireless receiver > speakers // computer audio interface
Audio interface // webcam mic // audio from HDMI > OBS mixer (software)
OBS mixer (balances room audio, HDMI input, lectern audio) > OBS audio plugins (for quality) > Youtube
Video Routing
4 HDMI inputs:
- classroom presentation PC
- HDMI in for personal laptop/ other PC
- * potential handheld camera
- other/empty
4 HDMI outputs:
- HR classroom TV
- HL classroom TV
- Lab projector
- Streaming computer capture
Any combination of input to output is possible in the switcher matrix.
There is also a webcam at the back of the room as a second input to the streaming computer.
Streaming computer:
HDMI signal from matrix, and webcam signal > OBS
OBS overlays/switches between inputs > Youtube
** Planning to add EDID emulators to outputs so that resolution and second-display configurations can stay stable when things are disconnected/powered off
Streaming software (OBS)
We have a streaming server set up with Bitfocus Companion and OBS.
OBS is set up with multiple “scenes”: a PIP (default), a full screen webcam scene, and a full screen HDMI input scene
All scenes contain audio from all sources (so that switching scenes does not kill audio).
Audio is mixed such that the webcam (“room” audio) is quieter as to not overpower the instructor (lectern mics). The lectern mics should have relatively the same output volume, although some tweaking of the input knobs on the mixer at the lectern may be needed depending on the proximity of the mic to the presenter and how loud they are.
If they are quiet and the mic is farther away, the feedback destroyer might degrade the audio signal due to it trying to minimize feedback in the room, so the presenter will want to get the mic closer to them and speak louder if possible.
The webcam (“room mic”) will theoretically also pick them up for the stream, but this should not be relied upon, as it’s too far away and will have a lot of background noise for anyone needing to turn it up to hear, not to mention anyone in the back of the room being disproportionately loud.
For video, OBS has the webcam source and the HDMI source from the switcher.
By default, to keep things simple, it will have the HDMI source full screen, with a PIP overlay in the bottom-right corner of the webcam at the back of the room.
It may be possible to output from the computer back into the switcher a “program out” that shows what the stream will be seeing and route that to always show on the classroom projector for instance, but we would want to be very careful of audio (or video) signal loops.
OBS uses a plugin called Advanced Scene Switcher, and if it detects our slide templates, will automatically switch to the full screen slide (no PIP) for 30 seconds (or whatever we set it to) before switching to another scene (PIP or full screen webcam, etc).
This also allows for detection of changes to other media (such as a different computer screen, camera, etc) coming into the HDMI capture from the switcher to use other switching behaviors. This still has yet to be programmed and tested, so remains using PIP by default for now.
Control (Bitfocus Companion)
Companion is the coolest shit ever. It uses a variety of protocols and AV hardware to automate control over the network and it’s amazing. I once figured out during a corporate event how I could not only control PTZ cameras and switch them to their stream and program outputs automatically as I made adjustments, but also when I ran a particular macro for their karaoke party at the end of the night (long story), I could signal the light in my office at home to turn on and off between each song. Yes, it can do that.
It controls the switcher hardware and OBS (*anything else?), so buttons can be programmed in Companion to change the combination of switching configurations, check and change audio levels to the stream, start and stop the stream, etc. It could potentially also control the presentation PC, but as most of our members use Google Slides and it can’t be controlled like a standalone app since it’s in-browser, a clicker or just changing slides manually will be needed instead.
** Note: if we could solve for this, we could make automatic switching much more reliable and less resource-intensive
The buttons for Companion are available on the controller mini PC (Pipo touchscreen), or by using the internal URL for buttons on a phone or tablet (scan the QR code while connected to Members LAN)
Classroom Presentation PC
The presentation PC has a folder on the desktop synced with Google Drive, using a unique org account for Google (to avoid causing issues with other accounts or the main org’s drive).
Presenters can upload their presentations to a shared Google Drive folder it’s synced with, so that the presentation is available on that PC. It has one HDMI out going to a nearby monitor, and a second output going to the switcher via an extender (so they can have a presenter view and a secondary full-screen slides display).
The presenter can start their presentation and then use a clicker or mouse/kb to go through their slides. Not much else to it.
(*plan on adding EDID emulator to the output so windows always detects 2 displays*)
Manuals and Documentation
Audio
- Dynamic mic
- Headset mic and Tx/Rx
- Mixer
- Feedback Destroyer
- RCA wireless Tx/Rx
- Studio Monitors
- Mbox2 interface
Video
- HDMI extenders
- EDID emulators
- Matrix Switcher
- HDMI capture card
Software/Computer Configs
- PiPo/Debian
- Google Sheets/Libre Office/other presentation apps
- Bitfocus Companion documentation
- Streaming server container info
- OBS documentation
- Advanced Scene Switcher documentation