Using the Laser cutters…
Arch Reactor’s two laser cutters can engrave images and can cut out shapes. It’s not at all uncommon to perform both tasks, though some material that can be engraved cannot be cut by the laser. Document preparation is key, as is selecting the proper power and speed settings. Please be prepared to ask for assistance and please TEST!
The two lasers are similar in terms of what items they will cut and engrave, but they are dramatically different in size and have several differences
What materials can be used with the lasers::
- Wood
- Acrylic – use Cast rather than Extruded acrylic if at all possible. They are manufactured at different temperatures and Extruded acrylic will often crack and craze, especially if exposed to any chemicals
- Paper – go fast and use low power, but it can produce Spectacular results! (Niels is the expert with paper)
- Leather – depending on how it is finished, some finishes will react badly in the laser, and leather has a tendency to flame. (perhaps try masking with tape?) (Sam has recently engraved and cut leather beautifully)
- Glass – non-tempered – can supposedly be engraved but cannot be cut (not sure anyone at AR has tried this yet. please be careful and Share Your Results!) (There are many lasered pieces of pyrex on the internet – please research before trying)
- Anodyzed and Powder-Coated metals – Cannot be cut, but they can be engraved which removes the coating to expose the bare metal beneath
- Marble and Granite – Both Bob S and Myles F have the most experience with these materials
- Ceramic Tile – Cannot be cut, but the top finish can be etched off. Recommend color-filling the engraving.
- Rubber – Can stink, but can make awesome rubber stamps! Check with Niels or Diane for more info
What materials cannot be used with the laser::
- Anything containing chlorine. Not only are the fumes poisonous, they will destroy the components of the laser itself. If you are unsure, Google it! (There are ways to test unknown materials – check with Diane)
- Metals – Metals cannot be cut, though some can be engraved and/or otherwise marked.
- Tempered glass – Supposedly it will shatter
- Anything reflective – it will bounce the beam and you could end up burning something across the room by accident (TRULY!) (Some reflective materials can be masked, as with masking tape)
- Anything too thick to fit in the bed. (at a guess, probably 4-5″ thick is the current maximum)
- LEXAN Polycarbonate does not cut well. Will scorch too much before it cuts. See the sample in the pile of scrap.
Preparing your Image::
- LaserCad (small laser) and ??? (large laser) imports .dxf files. These can be produced out of Corel, Inkscape, and probably several other image programs
- Corel, Inkscape and others can open/import a variety of other file formats.
- From within Corel on the small laser computer there is an icon on the taskbar near the top right half of the screen that is a blue square with a white arrow. If you have an image within Corel, click on this icon to take the image directly into LaserCad
- Corel is not currently installed on the large laser – prepare your image on the small laser computer and transfer over the PWJ5 file via a thumb drive
- LaserCad can also engrave .bmp files.
- Engraving photographs can be really awesome but image-preparation is Key. Here’s an Instructable for image-processing if you have Adobe Photoshop. The concepts are explained well enough that if you’re good at image processing in a different program the concepts might be helpful. http://www.instructables.com/id/How-to-Laser-Engraving-Photo/?ALLSTEPS
Working within LaserCad::
- Import (not open) a .DXF file exported from inkscape, corel, illustrator, etc. Make sure you used millimiters when you prepared it. OR open a LaserCad file from before. OR draw your design in LaserCad directly.
- The blue dot is the “origin” point of the file, the position that the laser-head is when the job is started
- You can change the location of the origin with the X feature. This is located in the toolbar (look for an icon of two small boxes and an arrow pointing to a small dot)
- You can edit images and add new features within LaserCad, such as drawing circles or boxes or adding lines.
- There are a series of “shape” icons on the left side of the screen. Choose the desired shape and draw.
- You can rotate your image, either with arrows or by typing in the degrees of rotation.
- The different colors in your image are different ‘layers’
- Click and drag or double-click to select a portion of your image
- Once highlighted, click on one of the colored squares on the bottom of the screen to select a color
- Each layer can be set to different engraving/cutting settings
- The colors and their settings are displayed in a window on the right side of the screen
- Double-click any color to bring up the window to set/verify the settings of each color
- Set each color to “Engrave” or “Cut”
- Set the speed and power values for each section
- In the Engrave section is a field named “Scan Gap”. Typically leave this set to .1
- There is an option to set “work times”. Normally set at “1”, if you know you’ll need to run multiple passes, you can change that value.
- There is also an option to “pulse” the laser.
- You control the order of engraving/cutting operations by arranging the colors in the order you wish them to occur.
- Set the order by using the “up” and “down” buttons immediately under the color/settings window
- It is recommended to engrave prior to cutting
- It is also recommended to cut small, internal areas of the image before cutting out large shapes.
- Once your image is ready, click “download” (below the color-selection on the right side) to download your image to the laser (the laser must be turned on)
- The download box will allow you to set a file-name for your job
- There is an option to set “work times”. Normally set at “1”, if you know you’ll need to run multiple passes, you can change that value (here for all parts, or as above for the individual “color”)
- If you check “auto group engrave” it will engrave small sections of your image separately instead of sweeping across the entire row
- Depending on your image, sometimes this will save you time, sometimes it will add a LOT of time to your job
A few notes on Engraving vectored images::
- Only fully closed objects can be engraved. Even if the starting and ending node are stacked atop each other, if they are not joined, the image will be ignored.
- Both computers are set to “fill in” areas that will be engraved. Check closely.
- If you have duplicate images stacked on top of each other that are the same layer/color, they will not engrave properly.
- If you have asked Corel to “trace” an imported image, sometimes Corel will duplicate lines in the center of an image. Tracing text, for example, may put a double-line in the middle of letters, like the interior loop on the letter “o” for example.
- If the letter “o” cuts (or is simulated) as a solid circle, check to see that you don’t have two interior lines stacked atop each other
- Engraving seems to treat each encounter with a layer/color as a toggle on/off switch.
- If you want to engrave text such that the letters are “etched into” the surface, have the layer set to just the inner and outer lines of each letter
- If you want to engrave text such that the background is etched away and the text remains at the original level of the material, draw a “bounding box” (of any shape) around the text.
- The same applies to images, which can be etched into the surface or you can use a bounding-box to etch away the background, leaving the image raised
- While engraving, the laser will “overshoot” the edge of the engraved edge.
- This effectively narrows your allowed image size.
- If the engraved edge is too close to either the left or right side of the laser bed, you will get a “beyond size” error which might hit mid-way through a job, effectively ruining your run
- At speed 300 it’s recommended to leave at least 1/2 inch on either side of the field to accommodate this “overshoot”
Operating the Small Laser Cutter
- Reach around to the power supply located far back on the right side of the machine and flip the green switch.
- Wait for the laser cutter to travel to ‘home’
- Use the up-down-left-right buttons on the control panel to move the laser head out of the way so that you can position your material
- The Cutting area of the Laser is: 250mm x 500mm or 9.625 in x 19.3 in
- The Engraving area of the Laser is less than 500mm
- When engraving, the laser head needs to move past the edge of the engraving
- How far past the edge of the engraving is dependent upon the speed of the engrave. Faster = Farther (300 speed = approx .5″ on each side)
- If the laser head needs to travel outside the edge of the bed and cannot, it will immediately stop the job and flag an error (See Troubleshooting)
- Using the ‘Z/U’ function, position the Z axis of the laser cutter to your desired height.
- There is a wooden block labeled “Laser Focus Guide” on/near the laser.
- Hold the wooden block vertically, such that the “notched” end is on top
- Set the un-notched edge on the top of your material and use the Z/U function to set the metal plate holding the nozzle onto the “notch” of the wooden block
- Press the Z/U button on the laser control panel
- Use the down-arrow to select the Z-Axis option then wait a couple of seconds
- Use the up/down arrows to adjust the Z axis
- Most of the time you want the focal point to be at the very top of your material, so set the bottom of the nozzle plate onto the notch of the focusing block
- If the laser will not go “down” far enough, see instructions in the Troubleshooting Section
- These steps will place the laser focal point at the surface of your material
- Use the up-down-left-right buttons to position the laser head at your “origin point” (the point identified by the blue dot within LaserCad)
- Press the “Laser” button to “test-fire” the laser to verify your origin point
– WARNING!!! Do NOT leave your hands inside the frame when test-firing the laser! (Yes, you can burn yourself. Yes, it HURTS!) - Once you have the laser head at your desired origin point, press the “Origin” button to set the origin position
- After downloading your file, press the Box button. The laser head will travel the outside path of your image so that you can verify the position of your material
- Close the lid
- Press the green Start button
- The laser will beep when finished.
– the control panel will display the elapsed time of your job - When the job completes, check the time (if you care), lift the lid, and use the up-down-left-right buttons to move the laser head out of the way.
Operating the Big Laser Cutter
The Big laser cutter has a bed size of 900mm x 1200mm (roughly 3′ x 4′)
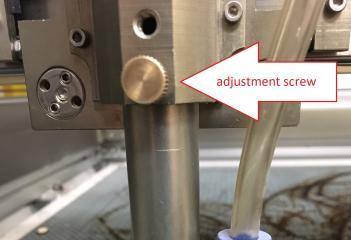
Please do NOT attempt to adjust the Z-Height!
Do not use the control panel Z-axis buttons at all!!! Currently the z-height is limited to approximately 3-inches tall. Upgrades are planned which will hopefully, eventually allow engraving of items approximately 8-inches deep.
On the right side of the laser is a large panel of switches:
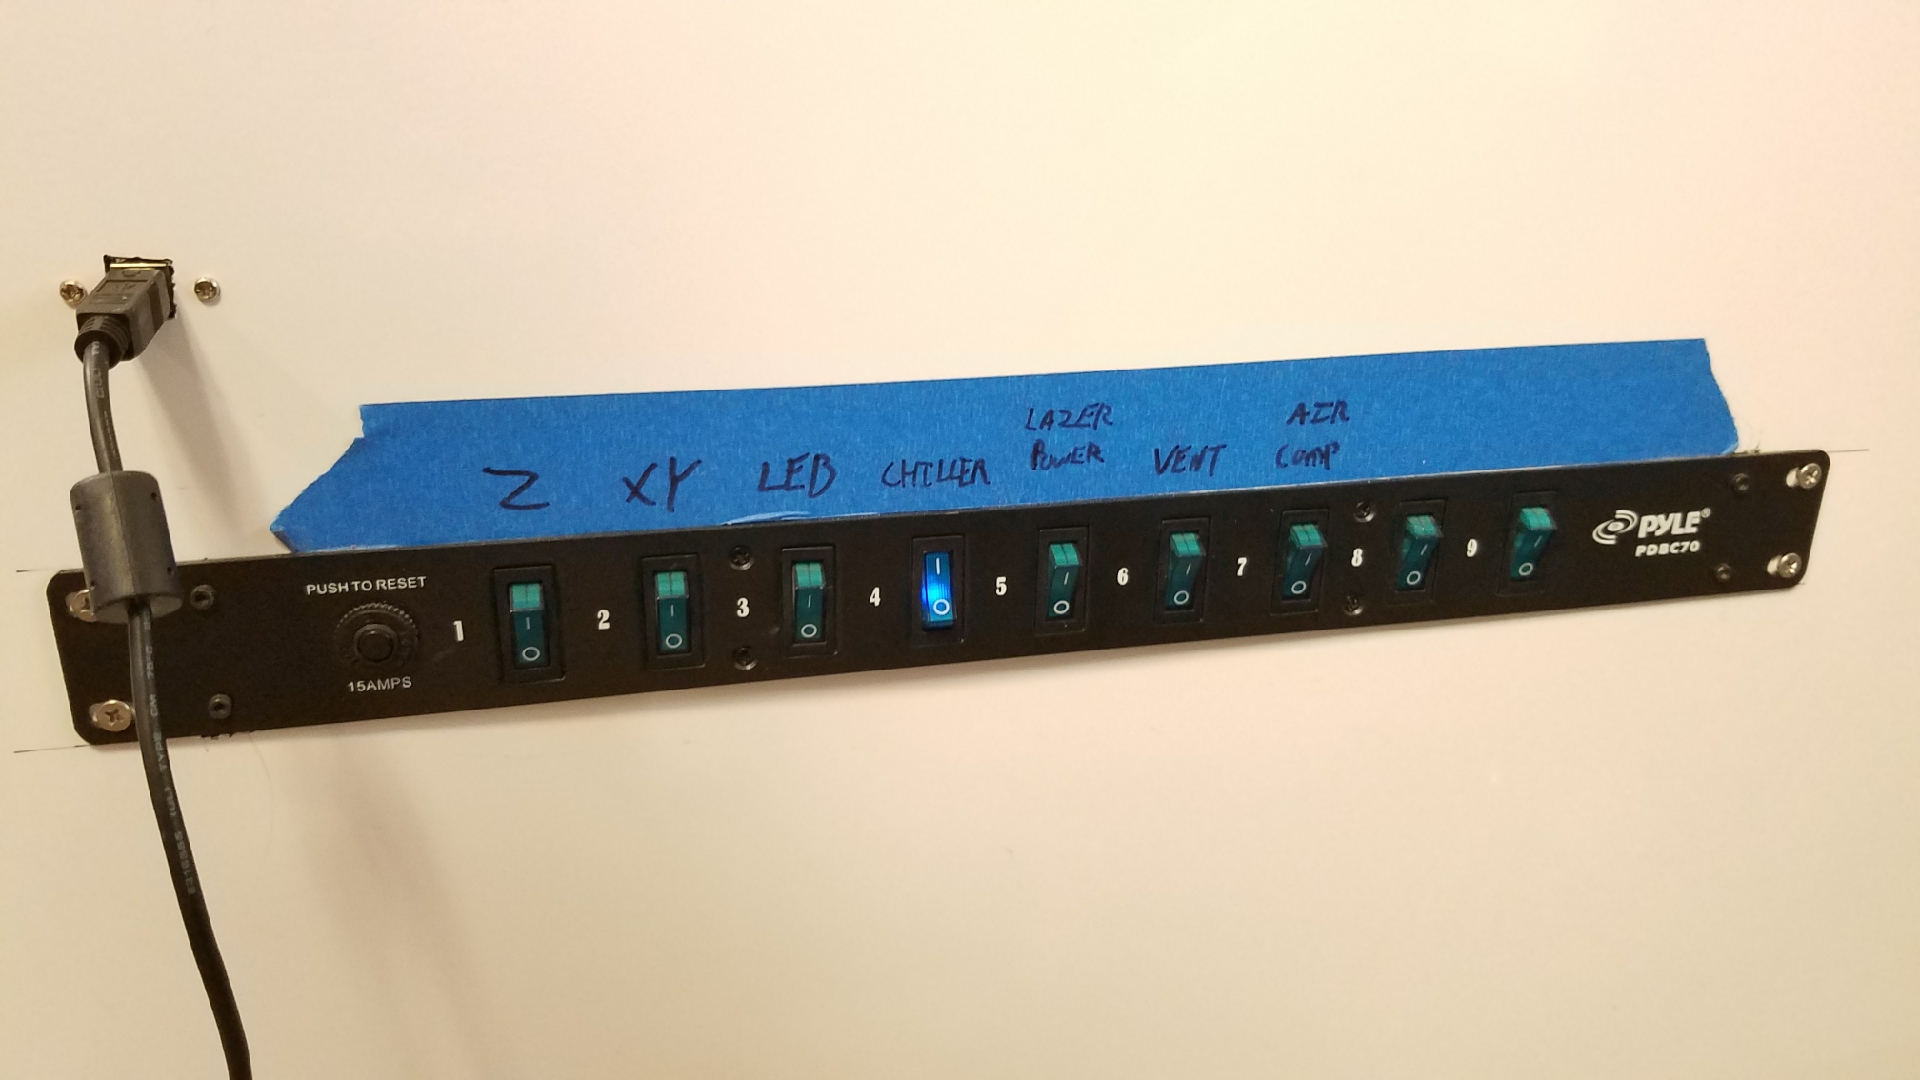
- Turn on chiller switch first. It will make alarm-sounds at you when it first turns on. If the building is over about 85 degrees when you turn it on, wait about 5 minutes before starting your job to allow things to start cooling down. Once it “gets to temperature” you should never hear the alarm-sounds again. If you do hear alarm-sounds after the initial starting alarm, STOP THE JOB IMMEDIATELY! The tube is in danger of overheating and being ruined.
- Turn on the Z and the XY switches. They will re-set the laser first to the home position (Home is defined as the top right corner) and then move the laser head to the last Origin point
- If the laser is running and you hit “Reset” it will re-home to the last set Origin position.
- Turn on the LED switch to turn on the interior lights
- The Laser Power switch turns on the power to the laser
-
Once the laser is turned on, operation moves to the top laser control panel. This panel works much like the small laser except that you have to set the z-axis manually (with the screw, NOT the arrow keys).
-
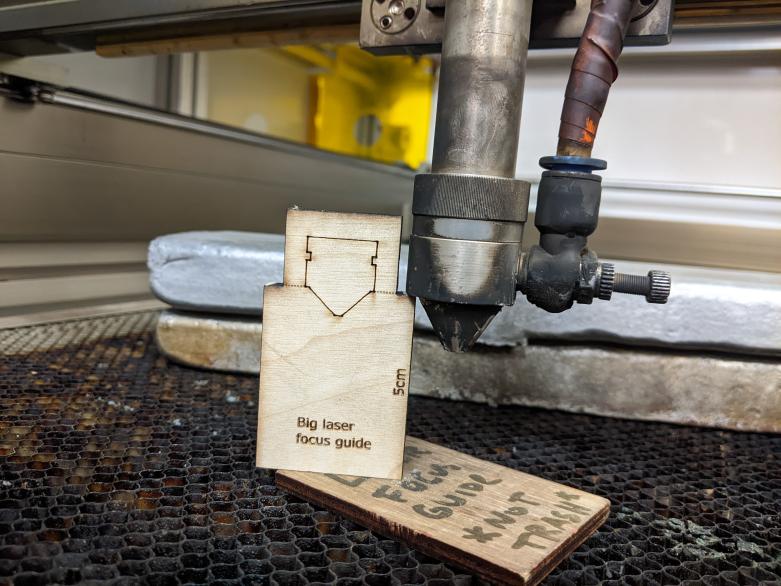
You will NOT raise and lower the bed with the control panel, you will raise and lower the laser nozzle with your fingers after loosening the screw. To set the z-axis, use the wooden gauge to determine the proper height. Loosen and tighten the “adjustment screw” to set the focus. Do Not Use Tools on the adjustment screw!!! See images:
-
-
Use the arrow keys to move the laser-head in the x and y directions to your origin point and push the origin button. Once you’ve downloaded your image, use “test” to trace the “box”.
-
In January, 2019, the controller for the large laser was replaced and EVERY recommended setting changed. As of January, 2019, the settings for the large laser fairly closely approximate the settings for the smaller laser. Minimum power to cut or engrave is 8%. the laser will not fire if the percentage is lower.
- In Late-January of 2022 the settings for a clean-cut of .25 birch were 30 speed and 40 power
-
Be careful of the lid. The laser will fire with the lid open. Also make sure the lid is either fully open or fully closed as it might slam shut if only partially opened.
- The Vent switch is for the exhaust vent. Turn on the Vent Switch just prior to running your job. If there’s going to be a reasonably long break between jobs, turn the Vent switch off between jobs.
- Turn on the Air Comp switch just before starting the job. The air compressor pushes air through the laser nozzle to push smoke and debris out of the way of the beam. If there’s going to be a reasonably long break between jobs, turn the air compressor switch off between jobs.

Troubleshooting:
- I tried to open my .dxf file in LaserCad and I can’t find it
- You have to “import” .dxf files into LaserCad, not “open” them
- I imported my file into LaserCad and there are all sorts of extra lines that I wasn’t expecting
- There are a few remedies for this, though not all of them work. You can try:
- In Inkscape, save the file as a .PDF. Open the PDF in Corel and then save as .dxf (a good solution if you’ve used Inkscape Path Effect Editor to place text on a curve)
- Open the file in Corel and see if Corel can “automagically” clean the file
- Use Corel to “trace” the image again, sometimes this gets rid of extra or overlapping nodes
- There are a few remedies for this, though not all of them work. You can try:
- I opened my .svg file in Corel and there are a ton of lines exploding out of the screen
- Inkscape has a proprietary .svg format that can cause this. Try saving as “standard .svg” or as a pdf before sending to Corel
- I created an image that looks great in Inkscape but it doesn’t look right in Corel or LaserCad
- On the main LaserCad computer – open the file in Inkscape
- Save it as a Windows MetaFile
- Import the WMF file into Corel
- Use the “send to laser” button in Corel to send the image to the laser.
- This will Often (not always) work
- For the small laser Only – I tried to adjust the z-axis but it won’t go “down” far enough
- Select Menu -> Axis Control -> Reset Z. Let it run until your piece fits and then hit stop. Make sure to pay attention and not jam the Z table into the bottom of the machine. From there you can adjust the Z up as needed.
- There are sections of my engraving missing
- You might have a shape that looks closed but is not. The “end” nodes of a non-closed shape need to be joined together (there’s an Inkscape option for this)
- You might have duplicate shapes on top of each other. This can happen in Corel’s “trace” option, especially on internal closed shapes.
- Try this: Click on the image that’s being ignored, then “move” it out of the way. If there’s an exact duplicate underneath in the old location, delete one copy of the image and try again
- Is there a way to try to make sure that my image to engrave is going to work?
- Both laser computers are set to “fill in” with color any area that will engrave. If it isn’t “solid” on the computer then it won’t engrave properly
- On the toolbar there is a “simulate” option. Select your image, set the Engrave parameters, then hit “simulate”. It will show you what it will engrave and what it will ignore.
- I engraved and/or cut acrylic and when I tried to clean it it suddenly had a lot of tiny cracks all over
- Normally indicates your acrylic is extruded rather than cast.
- When I tried to download an image to the laser I got a “no data” message
- This indicates that all of the layers are deselected. In the top right of the LaserCad window ensure that at least one layer has a checkmark.
- When I tried to start a job I got an “out of bounds” error message.
- Double check that your project does not extend outside of the dimensions of the laser cutter. Most commonly this is due to a misplaced origin point. For example, you expected the origin to be bottom left but it is set for top right.
- I was in the middle of engraving an image when the laser suddenly stopped and displayed an “out of bounds” message
- Ensure that you leave room on either side of the engraving to allow the laser to accelerate and decelerate. The faster the engrave speed and the more room you’ll need to leave on either side.
- Unfortunately there is no way to re-start an engrave if this happens
- I hit origin on the keypad but the machine is not actually cutting at that point.
- Try moving your object around on the screen within LaserCAD and redownload your file. If the object moves in the same directions on the laser cutter, send Travis an email.
Material Guidelines / Examples:
- Big Laser: Starting suggestions for 1/8″ baltic birch = power 20% at 300% speed for a nice engraving.
- Big Laser: Starting suggestions for 1/4″ birch plywood = power 40% at speed 30 for a clean cut
- Small Laser: Starting suggestions for 1/8″ colored acrylic = power 20% at speed 175, for engraving
- Small Laser: Starting suggestions for 1/8″ colored acrylic = power 100% at speed 12, two passes for a clean cut
- Small Laser: Starting suggestions for 1/4″ colored acrylic = power 100% at speed 5, three passes for a clean cut
- Big Laser: Starting suggestions for 1/4″ colored acrylic = power 100% at speed 8, one passes for a melty cut
- Big Laser: Starting suggestions for 1/8″ colored acrylic = power 50% at speed 15, one pass for an ok cut
- Big Laser: Starting suggestions for 1/8″ colored acrylic = power 8% at speed 150, for a shallow engraving